


MyDisneyExperience App: Experience the Magic of Functionality!
This article may contain affiliate links that I receive a small commission from. This helps me keep bringing the magic to you! Thank you for reading.*
For all of you who have ever been to Walt Disney World, you will know the level of planning required to successfully see the magic without a hitch. Since 2013, park guests have had the option to utilise the MyDisneyExperience app to make this more seamless and intuitive.
My overview is going to go over the basic functionalities of the app for those of you who are unfamiliar with MyDisneyExperience or have limited experience with it. For those of you who have a grasp of the app, this is going to be more of a refresher. And if you're looking for more of an advanced walk-through, this may not be for you.
Now that we have that out of the way, let's get going!
There are many advantages to the app, from being able to see wait times for rides, all the way to booking your resort room! Today I’m going to go through the app to help those who want to take full advantage of the functionality of magic in their pocket!
So, where to start?
Let’s start with the opening screen. If you have not already done so, you will be required to make a login for use with the app. This is going to give you access to link everything together.
Now, I’m going to assume you have your login made and ready to go. Your app should look something like this:

By default, you should be able to see the map for the Magic Kingdom. It’s pretty precise: you can basically ‘walk’ through the parks if you so choose, or if you get lost while you’re there. I may or may not just ‘walk’ around when I miss Di’ney Worl’. Let’s be real, son.
Enough nostalgia for one section. Now as you can see, there is a little filter button and list button. The filter button will allow you to select which area of Disney (Magic Kingdom, Disney Springs, Contemporary Resort, etc.) that you want to look at. The list button will change your view between the map view and showing a list of the selected field: in our case, wait times.

You can now view which rides have how long of a wait time. This can be quite helpful in determining if you should head to a ride or just get another churro.
How do they determine wait times anyways? Well, someone in line will be the chosen one to get a little red card. When they get to the front of the line, the cast member will take it to determine wait times for that given point for the ride.
At any rate, if you see Seven Dwarves Mine Train, Space Mountain, Peter Pan’s Flight, Frozen Ever After, Avatar Flight of Passage, of Na’vi River Journey with a wait time of 40 minutes or less, RUN RUN RUN to that ride! That’s about as likely as snow in July in Hawaii.
Attractions
If you slide over to attractions at the top of the app, you can select an attraction by clicking on it. This will give you a description of the attraction to help you determine if it is something to do or skip. Especially helpful if you only have a limited amount of time.

Characters
Now, let’s move onto characters. Part of the reason for visiting the parks is to meet your favourite characters. Ariel, Belle, Olaf, Aladdin... you do you.
You can view characters and their respective areas on the app. For instance, below is what shows up in the Magic Kingdom:
After you click on a character, you can see where they are located in which park.
Dining
On to one of the more *ahem* important aspects of the app: dining. Dining will show you your options for both quick service (fast food essentially) and table service (sit-down dining) restaurants. Not only will you be able to see a listing of options, but also menus and pricing (some exceptions exist). I know besides looking at restaurant reviews, food selections and theming have played a vital role to myself and my family in deciding where to eat and which dining reservations to make.
In addition to looking at options, you will also be able to reserve dining for table service restaurants on the MyDisneyExperience app. Let’s go through what this entails.
180 days out from your trip, you will be able to start making dining reservations. To do so, you will click on your restaurant of choice, in our case Liberty Tree Tavern, and click Reserve Dining.

Enter your party size and date of choice, then select what time you’re looking for. I’m going to select dinner. Once that is done, reservations that are available (if any) will show up:
You will be taken to the Review and Confirm page. Once you have agreed to the terms and conditions and have input a payment method to hold your reservation, you can click Book Now. Your reservation will show up under My Plans (more on that later). You can also choose to have your reservation and confirmation # emailed to you.
In the case of certain quick service restaurants, you can order food and pick it up later to expedite line waits times.

As you may have noticed, you can also see which restaurants accept the Disney Dining Plan if this is an option you have chosen.
The next tab is restrooms. This is going to be important for obvious reasons after dining... Enough said.
Entertainment
You will be able to look at what entertainment is provided in the parks. In terms of planning, this is going to be helpful in scheduling in must-see entertainment as well as determining optimal times for rides if you can spare seeing a certain show. Not sure about you but Move It! Shake it! Dance & Play It! just makes me wonder how close those costumed cast members are to tossing their biscuits. I’d much rather go on a ride than watch them try to hold it together in that heat.

One thing I will mention is that there is an option to Add to My Plans for the entertainment offerings. This will go into your itinerary that also includes resort reservations, dining reservations, and Fastpass+ selections to keep it all in one handy spot.
Events
The next section on the MyDisneyExperience app is events. A variety of events take place at the parks throughout the year. Some such events are Mickey’s Not-So-Scary Halloween Party, Disney After Hours, and Epcot’s Food and Wine Festival. You will have the option to check out the events as well as get information on pricing and how to book yourself in for these events (given the event will be taking place in the near future).
Tours
Similarly to events, tours can also be viewed on the app. Pricing and how to book will be included within the description of the tour.
PhotoPass
A listing of areas with professional photography services will be listed. You’ll be interested to learn that even if you do not have a Memory Maker (we’ll discuss this in a later article!), photographers will often take pictures with your phone if you want. Disney ain’t about to deny you the magic!
Guest Services
If you’re coming to Walt Disney World with a family, Guest Services very well might be your new best friend! From ATMs to buy all that Disney swag, to first aid stations for your little one’s boo-boos, you can find directions to all the services you may need.
Resort Hotels
You will find a listing of all Disney resort hotels underneath this heading. Disney even makes it easy for you by giving you the option to call and book one! Imagine that.
Recreation
Everything from resort pools to cultural experiences are listed here. There is something for everyone at Walt Disney World!
Shops
Of course, what Disney app is complete without listing all the shops you can get your Disney fix at?? Just in case you’re starting to go into the fetal position from lack of swag, Disney will be able to tell you where your nearest shopping high is at. If you’re not one to shop at a brick and mortar shop, or if you can’t wait, there’s always online shopping too.*
Spa
For all you tired moms and dads out there, what vacation is complete without a spa? Disney has a wide array of spa locations to let you put up your feet and get ready to jump up and go again!

Now that we have some of the basics out of the way, let’s talk about what you can do to customise the app to yourself and your Disney experience.
Let’s Customise Our Experience!!!
Click on your avatar (in my case, Snow White). This is the view you should see.

First off, let’s click My Account. If you click change character, you will be able to select a character to represent yourself in the app:

You will be able to add and change personal information such as name, birthday, contact information, payment method, etc. You can also add annual passes for all you lucky Floridians out there.

You will click Link a Main Entrance Pass. After this, you will be asked to enter your 12 digit ID and the last name as it appears on the pass. Similarity, you can link any MagicBands or cards you may have, as well as customise MagicBands if you are staying on resort.
At the top of My Account, you will notice there is a section for Family & Friends. This allows you to manage other people’s FastPasses+, MagicBands, etc. Sometimes it’s handy to just have one person keeping it all together.

You can share your list also, which will allow connected guests to make plans together.
Going back to the screen that shows your avatar at the top, you can look at a variety of different topics. Today’s show times, park hours, my tickets, buy tickets, and annual pass blockouts are listed under park info & entry.
Looking at My Tickets, you will be able to see any tickets you have assigned to your account, as well as any that are assigned to a guest whose plans you manage. If you click the little plus symbol at the top, you have the option to buy tickets as well as link tickets and passes. Linking tickets will be as simple as finding the ID number and entering it.

As you can see, there is a very handy explanation as to where your booking ID can be located. You can also ask the Disney staff for your booking ID if booking over the phone. For a room with tickets, you would enter the last name the booking is made under along with the confirmation number provided to you.
If required, you can also reassign tickets to another guest whose plans you manage - one especially nice feature when your tickets virtually do not expire. Let that be a warning to any naughty children! Or naughty spouses! Naughty mother-in-laws! Even naughty neighbours! Or anyone else who gets on the wrong side of you!
But seriously, don’t go all Loki on your family. You’ve seen how that turns out.
Regarding annual pass blockout dates, you have the option to select your pass type to see which days you can go to the parks. Green days are those you can attend, with silver days as ones you cannot. Your blockout dates will be based on the level of pass you have.
My Plans
As promised, let’s discuss the My Plans section of the MyDisneyExperience app. Let’s be real, this section is the main reason to use the app in the first place.
Get Fastpass+
As discussed in my Fastpass+ article, you can make your selections 60 days out if staying on resort or 30 days out if you are not. Get it, fam!
Reserve Dining
This is another spot you can go to to reserve your dining. Once reserved, it will show up in your plans.
Order Food
Similarly, you can order food from Quick Service restaurants here.
Link Dining/Link Hotel
If you have a dining plan or hotel reservation, you can link it by entering your confirmation number and last name on the reservation.
Bringing it all together, you can click See All Plans. It should look something like this if you have added everything (I'm starting out my trip in the Magic Kingdom):


As you can see, there is the option to start online check-in to skip the line when you get to your resort. As a Canadian, I need to pick up my MagicBand at the front desk so I’ll just be going with regular check-in.
You can also click on any of your plans to modify or delete them. Be careful - if something gets deleted (like a reservation for Be Our Guest), you might have a hard time getting it back. Don’t go clicking around in places you ought not to be clicking in unless you’re sure.
This Just In!
Disney plans to offer resort guests the option to utilise a digital key using the MyDisneyExperience app. After online check-in, guests will be able to use the digital key to go right to their room, open resort doors, etc., similar to the way in which a MagicBand is currently utilized. MagicBands will still be required for park entry and charges to a guest's room, though.
Although the initial launch will be happening at Disney's Wilderness Lodge, other resorts will likely follow suit soon afterwards should it be well-received.
Well, there you have it. This may be a slightly basic version of navigating the app, but my goal is to make it easy so you can maximise the magic of your trip!
How do you like to use the MyDisneyExperience app? Any tips you’d like to add? Comment and subscribe :)

Let me book the magic for you! Click here to have me do the work for you!
For all of you who have ever been to Walt Disney World, you will know the level of planning required to successfully see the magic without a hitch. Since 2013, park guests have had the option to utilise the MyDisneyExperience app to make this more seamless and intuitive.
My overview is going to go over the basic functionalities of the app for those of you who are unfamiliar with MyDisneyExperience or have limited experience with it. For those of you who have a grasp of the app, this is going to be more of a refresher. And if you're looking for more of an advanced walk-through, this may not be for you.
Now that we have that out of the way, let's get going!
There are many advantages to the app, from being able to see wait times for rides, all the way to booking your resort room! Today I’m going to go through the app to help those who want to take full advantage of the functionality of magic in their pocket!
So, where to start?
|
||

Now, I’m going to assume you have your login made and ready to go. Your app should look something like this:
By default, you should be able to see the map for the Magic Kingdom. It’s pretty precise: you can basically ‘walk’ through the parks if you so choose, or if you get lost while you’re there. I may or may not just ‘walk’ around when I miss Di’ney Worl’. Let’s be real, son.
Enough nostalgia for one section. Now as you can see, there is a little filter button and list button. The filter button will allow you to select which area of Disney (Magic Kingdom, Disney Springs, Contemporary Resort, etc.) that you want to look at. The list button will change your view between the map view and showing a list of the selected field: in our case, wait times.
You can now view which rides have how long of a wait time. This can be quite helpful in determining if you should head to a ride or just get another churro.
How do they determine wait times anyways? Well, someone in line will be the chosen one to get a little red card. When they get to the front of the line, the cast member will take it to determine wait times for that given point for the ride.
At any rate, if you see Seven Dwarves Mine Train, Space Mountain, Peter Pan’s Flight, Frozen Ever After, Avatar Flight of Passage, of Na’vi River Journey with a wait time of 40 minutes or less, RUN RUN RUN to that ride! That’s about as likely as snow in July in Hawaii.
Attractions
If you slide over to attractions at the top of the app, you can select an attraction by clicking on it. This will give you a description of the attraction to help you determine if it is something to do or skip. Especially helpful if you only have a limited amount of time.
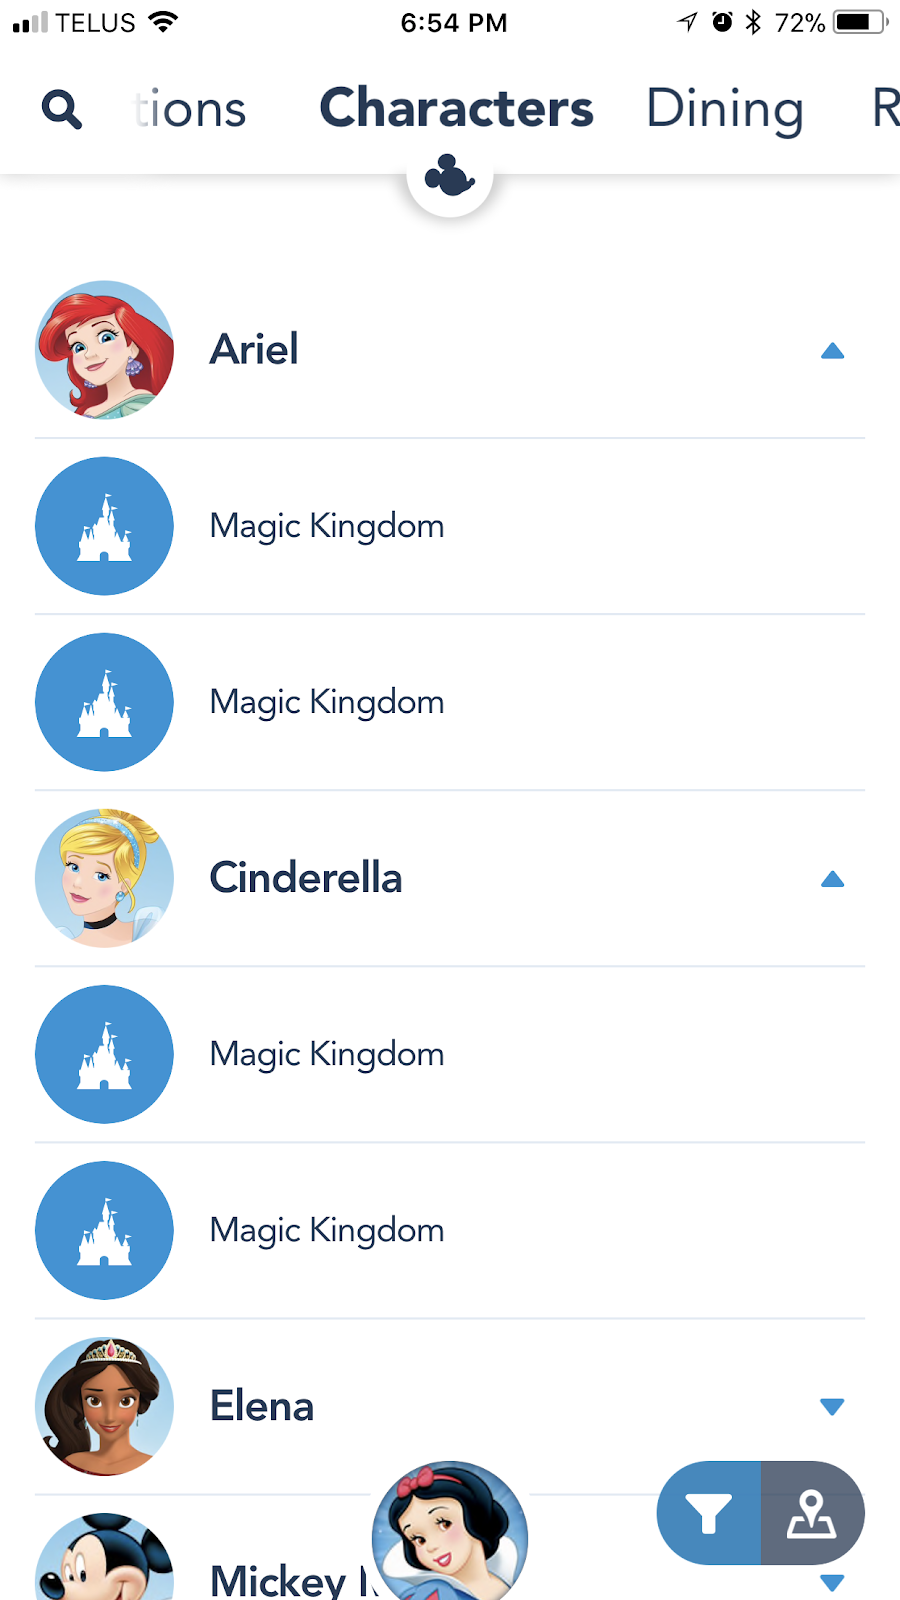
Characters
Now, let’s move onto characters. Part of the reason for visiting the parks is to meet your favourite characters. Ariel, Belle, Olaf, Aladdin... you do you.
You can view characters and their respective areas on the app. For instance, below is what shows up in the Magic Kingdom:
After you click on a character, you can see where they are located in which park.
Dining
On to one of the more *ahem* important aspects of the app: dining. Dining will show you your options for both quick service (fast food essentially) and table service (sit-down dining) restaurants. Not only will you be able to see a listing of options, but also menus and pricing (some exceptions exist). I know besides looking at restaurant reviews, food selections and theming have played a vital role to myself and my family in deciding where to eat and which dining reservations to make.
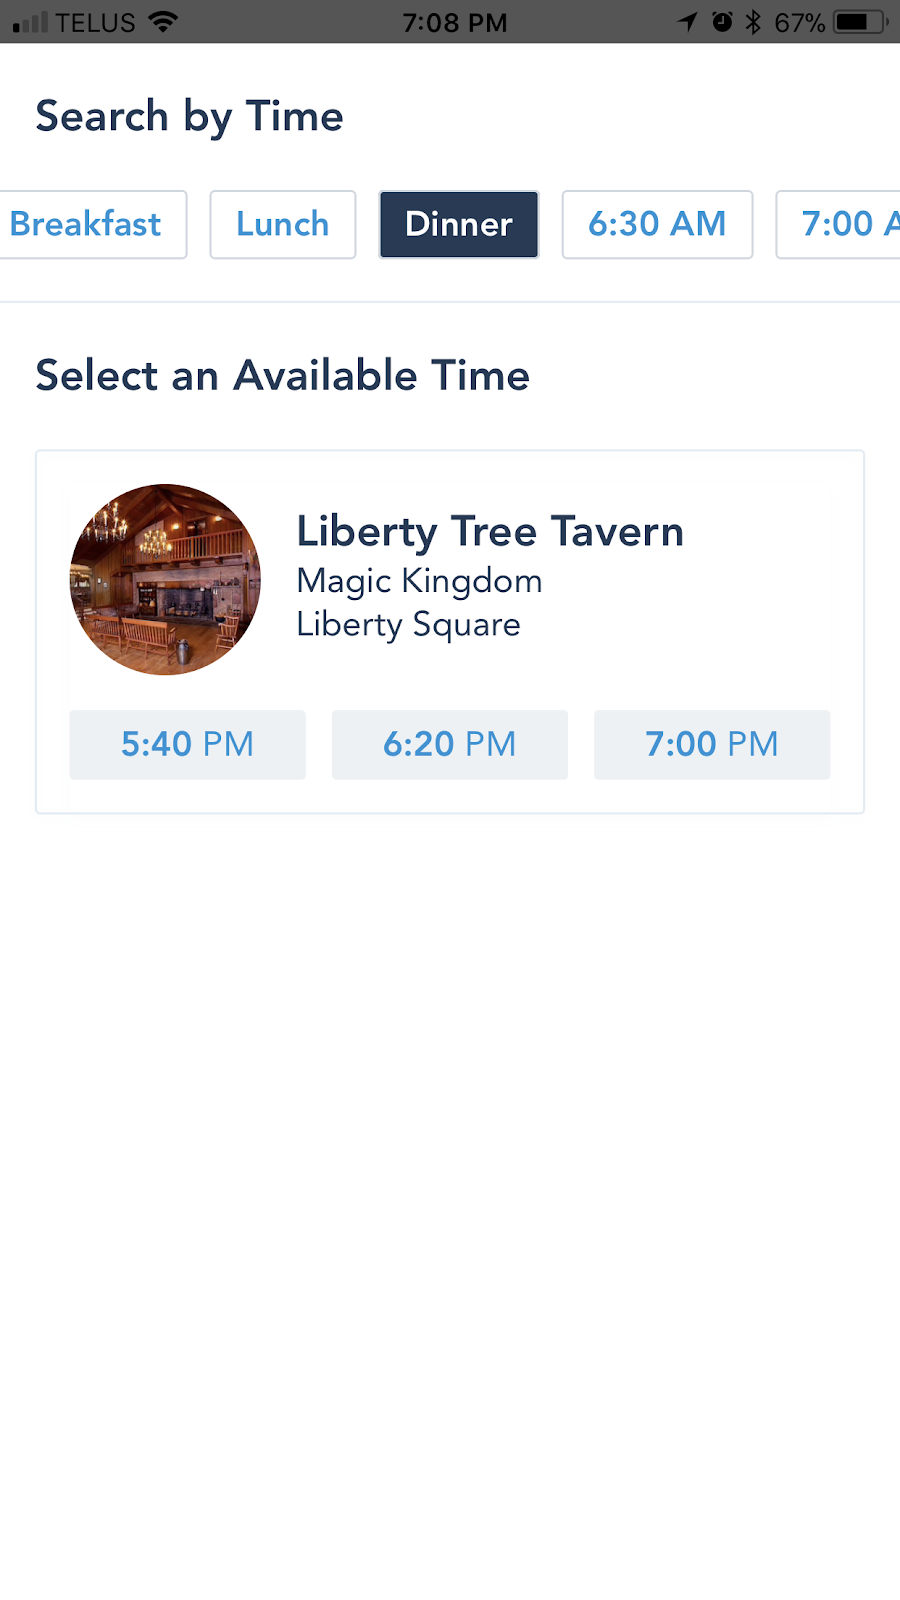
In addition to looking at options, you will also be able to reserve dining for table service restaurants on the MyDisneyExperience app. Let’s go through what this entails.
180 days out from your trip, you will be able to start making dining reservations. To do so, you will click on your restaurant of choice, in our case Liberty Tree Tavern, and click Reserve Dining.
Enter your party size and date of choice, then select what time you’re looking for. I’m going to select dinner. Once that is done, reservations that are available (if any) will show up:
You will be taken to the Review and Confirm page. Once you have agreed to the terms and conditions and have input a payment method to hold your reservation, you can click Book Now. Your reservation will show up under My Plans (more on that later). You can also choose to have your reservation and confirmation # emailed to you.
In the case of certain quick service restaurants, you can order food and pick it up later to expedite line waits times.
As you may have noticed, you can also see which restaurants accept the Disney Dining Plan if this is an option you have chosen.
The next tab is restrooms. This is going to be important for obvious reasons after dining... Enough said.
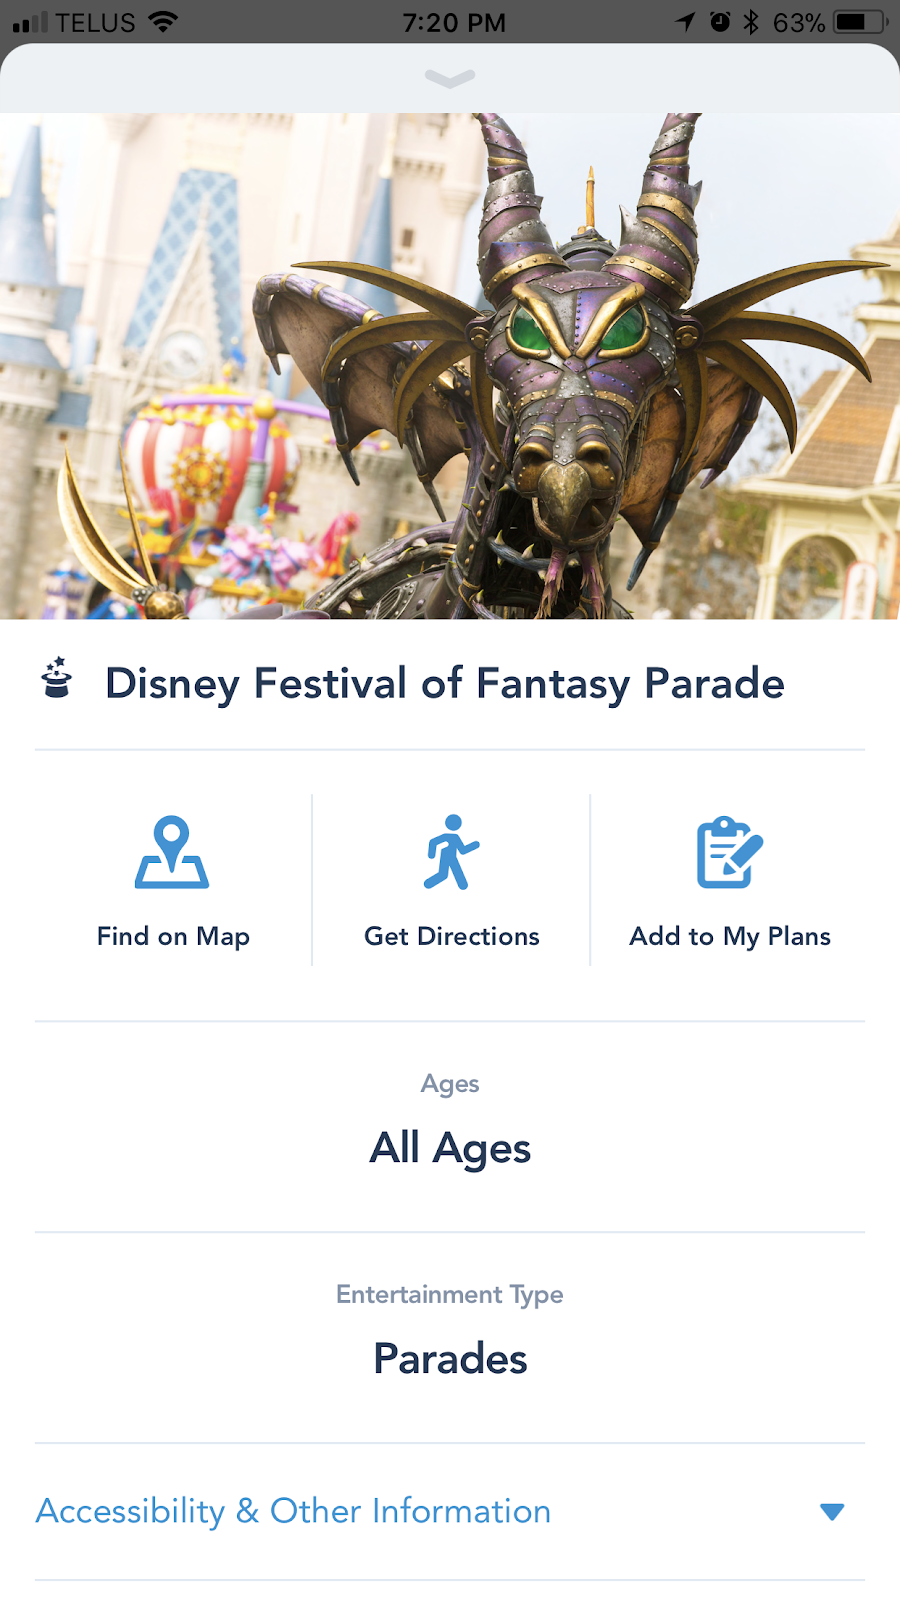
Entertainment
You will be able to look at what entertainment is provided in the parks. In terms of planning, this is going to be helpful in scheduling in must-see entertainment as well as determining optimal times for rides if you can spare seeing a certain show. Not sure about you but Move It! Shake it! Dance & Play It! just makes me wonder how close those costumed cast members are to tossing their biscuits. I’d much rather go on a ride than watch them try to hold it together in that heat.
One thing I will mention is that there is an option to Add to My Plans for the entertainment offerings. This will go into your itinerary that also includes resort reservations, dining reservations, and Fastpass+ selections to keep it all in one handy spot.
Events
The next section on the MyDisneyExperience app is events. A variety of events take place at the parks throughout the year. Some such events are Mickey’s Not-So-Scary Halloween Party, Disney After Hours, and Epcot’s Food and Wine Festival. You will have the option to check out the events as well as get information on pricing and how to book yourself in for these events (given the event will be taking place in the near future).
Tours
Similarly to events, tours can also be viewed on the app. Pricing and how to book will be included within the description of the tour.
PhotoPass
A listing of areas with professional photography services will be listed. You’ll be interested to learn that even if you do not have a Memory Maker (we’ll discuss this in a later article!), photographers will often take pictures with your phone if you want. Disney ain’t about to deny you the magic!
Guest Services
If you’re coming to Walt Disney World with a family, Guest Services very well might be your new best friend! From ATMs to buy all that Disney swag, to first aid stations for your little one’s boo-boos, you can find directions to all the services you may need.
 |
| I mean, come on! They have cake! |
Resort Hotels
You will find a listing of all Disney resort hotels underneath this heading. Disney even makes it easy for you by giving you the option to call and book one! Imagine that.
Recreation
Everything from resort pools to cultural experiences are listed here. There is something for everyone at Walt Disney World!
Shops
Of course, what Disney app is complete without listing all the shops you can get your Disney fix at?? Just in case you’re starting to go into the fetal position from lack of swag, Disney will be able to tell you where your nearest shopping high is at. If you’re not one to shop at a brick and mortar shop, or if you can’t wait, there’s always online shopping too.*
Spa
For all you tired moms and dads out there, what vacation is complete without a spa? Disney has a wide array of spa locations to let you put up your feet and get ready to jump up and go again!
Now that we have some of the basics out of the way, let’s talk about what you can do to customise the app to yourself and your Disney experience.
Let’s Customise Our Experience!!!
Click on your avatar (in my case, Snow White). This is the view you should see.
First off, let’s click My Account. If you click change character, you will be able to select a character to represent yourself in the app:
You will be able to add and change personal information such as name, birthday, contact information, payment method, etc. You can also add annual passes for all you lucky Floridians out there.
You will click Link a Main Entrance Pass. After this, you will be asked to enter your 12 digit ID and the last name as it appears on the pass. Similarity, you can link any MagicBands or cards you may have, as well as customise MagicBands if you are staying on resort.
At the top of My Account, you will notice there is a section for Family & Friends. This allows you to manage other people’s FastPasses+, MagicBands, etc. Sometimes it’s handy to just have one person keeping it all together.
You can share your list also, which will allow connected guests to make plans together.
Going back to the screen that shows your avatar at the top, you can look at a variety of different topics. Today’s show times, park hours, my tickets, buy tickets, and annual pass blockouts are listed under park info & entry.
Looking at My Tickets, you will be able to see any tickets you have assigned to your account, as well as any that are assigned to a guest whose plans you manage. If you click the little plus symbol at the top, you have the option to buy tickets as well as link tickets and passes. Linking tickets will be as simple as finding the ID number and entering it.
As you can see, there is a very handy explanation as to where your booking ID can be located. You can also ask the Disney staff for your booking ID if booking over the phone. For a room with tickets, you would enter the last name the booking is made under along with the confirmation number provided to you.
If required, you can also reassign tickets to another guest whose plans you manage - one especially nice feature when your tickets virtually do not expire. Let that be a warning to any naughty children! Or naughty spouses! Naughty mother-in-laws! Even naughty neighbours! Or anyone else who gets on the wrong side of you!
 |
| "I have the POWER!" |
But seriously, don’t go all Loki on your family. You’ve seen how that turns out.
 |
| "Dance, puppet!" |
Regarding annual pass blockout dates, you have the option to select your pass type to see which days you can go to the parks. Green days are those you can attend, with silver days as ones you cannot. Your blockout dates will be based on the level of pass you have.
My Plans
As promised, let’s discuss the My Plans section of the MyDisneyExperience app. Let’s be real, this section is the main reason to use the app in the first place.
Get Fastpass+
As discussed in my Fastpass+ article, you can make your selections 60 days out if staying on resort or 30 days out if you are not. Get it, fam!
Reserve Dining
This is another spot you can go to to reserve your dining. Once reserved, it will show up in your plans.
Order Food
Similarly, you can order food from Quick Service restaurants here.
Link Dining/Link Hotel
If you have a dining plan or hotel reservation, you can link it by entering your confirmation number and last name on the reservation.
Bringing it all together, you can click See All Plans. It should look something like this if you have added everything (I'm starting out my trip in the Magic Kingdom):
As you can see, there is the option to start online check-in to skip the line when you get to your resort. As a Canadian, I need to pick up my MagicBand at the front desk so I’ll just be going with regular check-in.
You can also click on any of your plans to modify or delete them. Be careful - if something gets deleted (like a reservation for Be Our Guest), you might have a hard time getting it back. Don’t go clicking around in places you ought not to be clicking in unless you’re sure.
This Just In!
Disney plans to offer resort guests the option to utilise a digital key using the MyDisneyExperience app. After online check-in, guests will be able to use the digital key to go right to their room, open resort doors, etc., similar to the way in which a MagicBand is currently utilized. MagicBands will still be required for park entry and charges to a guest's room, though.
Although the initial launch will be happening at Disney's Wilderness Lodge, other resorts will likely follow suit soon afterwards should it be well-received.
Well, there you have it. This may be a slightly basic version of navigating the app, but my goal is to make it easy so you can maximise the magic of your trip!
How do you like to use the MyDisneyExperience app? Any tips you’d like to add? Comment and subscribe :)

Let me book the magic for you! Click here to have me do the work for you!


Comments
Post a Comment